SVG icons go blurry at 16-24 px when their geometry lands between device pixels: sub-pixel coordinates, fractional transforms, odd stroke widths, or a non-integer viewBox force the rasterizer to antialias edges that should be sharp. This guide walks through fixing all four in Axialis IconVectors using the grid, snapping, whole-pixel coordinates, and a clean viewBox, then verifying the result with a raster export.
Why do SVG icons look blurry?
- Sub-pixel geometry — shapes or paths land between device pixels, so rasterizers must antialias them.
- Stroke math — a centered
strokewith an odd width straddles two pixel rows unless you offset it by half a pixel. - Fractional transforms — scaling or translating a group with decimals pushes edges off the pixel grid.
- Poor viewBox — a missing or non-integer
viewBoxmakes the icon scale unpredictably against the grid.
Step‑by‑step in IconVectors
- Start with a known canvas and show the grid
- Open or create: File -> Open... (Ctrl+O) or New Icon (Ctrl+N). Work at the size you ship at, such as 24x24.
- Grid and snapping: enable the grid and snap-to-grid in the View menu so vertices and shapes land on whole pixels as you draw.
- Pixel preview: in the Preview panel, flip the Pixel/Vector toggle to Pixel to see how the icon rasterizes at small sizes and catch soft edges early.

Design on a consistent grid (here 24x24) to target whole-pixel sizes like 24, 48, and 72 px. - Align shapes to whole pixels
Select shapes and check their X/Y position and Width/Height in the toolbar/panels. Prefer integer values so edges align with the pixel grid.
- Filled geometry: keep edges on integer coordinates so the fill boundary falls on a pixel boundary.
- Stroked geometry: use even stroke widths (2, 4) at small sizes; for odd widths (1, 3), offset the path by 0.5 so the stroke straddles a pixel centerline instead of a boundary.
- Flatten decimals: avoid fractional transforms on groups; reset scale to 1 and round positions back to whole pixels.
The capture below shows the three rules applied to nested rounded squares on the grid:
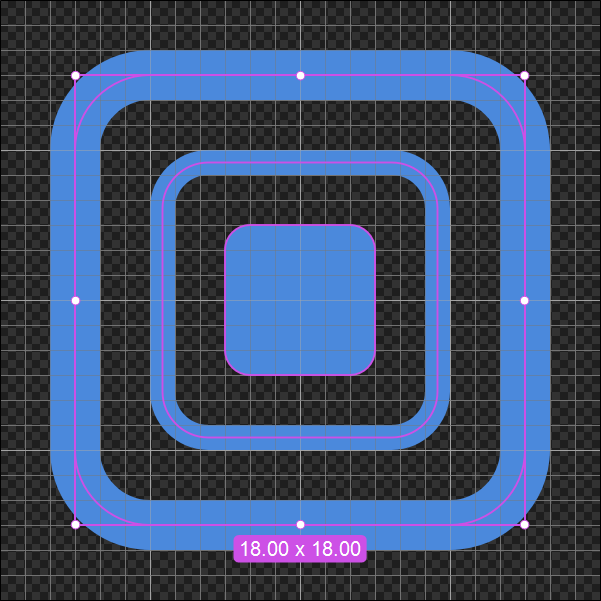
- Small inner shape: filled only, no stroke, so its edges align directly to the pixel grid on integer coordinates.
- Middle shape: no fill, 1 px stroke. The path sits on half-pixel coordinates (x=6.50, y=6.50) so the odd-width stroke lands on a pixel centerline.
- Outer shape: 2 px stroke on whole-pixel coordinates, so the even-width stroke splits evenly across the grid line.
Here is the SVG code:
<?xml version="1.0" encoding="utf-8"?> <svg xmlns="http://www.w3.org/2000/svg" version="1.1" xmlns:xlink="http://www.w3.org/1999/xlink" id="Icon 3" viewBox="0 0 24 24"> <path fill="#4B89DC" fill-rule="evenodd" d="M10,9C9.45,9,9,9.45,9,10L9,14C9,14.55,9.45,15,10,15L14, 15C14.55,15,15,14.55,15,14L15,10C15,9.45,14.55,9,14,9L10,9z"/> <path fill="none" fill-rule="evenodd" stroke="#4B89DC" d="M8.33,6.5C7.33,6.5,6.5,7.33,6.5,8.33L6.5, 15.67C6.5,16.67,7.33,17.5,8.33,17.5L15.67,17.5C16.67,17.5,17.5,16.67,17.5,15.67L17.5,8.33C17.5,7.33, 16.67,6.5,15.67,6.5L8.33,6.5z"/> <path fill="none" fill-rule="evenodd" stroke="#4B89DC" stroke-width="2" d="M5.99,3C4.36,3,3,4.36,3, 5.99L3,18.01C3,19.64,4.36,21,5.99,21L18.01,21C19.64,21,21,19.64,21,18.01L21,5.99C21,4.36,19.64,3, 18.01,3L5.99,3z"/> </svg> - Set a clean
viewBoxAt the root
<svg>, ensure a canonical, integer‑basedviewBoxsuch as0 0 24 24. This keeps scaling predictable.<svg viewBox="0 0 24 24" xmlns="http://www.w3.org/2000/svg">…</svg>Verify with View → Source Code (F3). The read‑only viewer is perfect to double‑check coordinates and attributes.
- Control stroke behavior on resize
Icons that scale across sizes can keep a consistent stroke width by using the SVG property
vector-effect="non-scaling-stroke". Add it on stroked paths after export:<path d="…" stroke="currentColor" stroke-width="2" vector-effect="non-scaling-stroke"/>For single‑size pixel‑perfect icons, you can omit it and tune stroke widths exactly to your grid.
- Export a quick raster check
Use File → Export → Export to Bitmap (Ctrl+F3) to preview 1×/2× PNGs (e.g., 24 and 48 px). Look for soft edges—if you see any, return to Steps 2–3 and tweak geometry.
Notes & troubleshooting
- Only some edges are soft — that shape likely has fractional X/Y or non‑integer dimensions. Round them.
- Diagonal lines will always be antialiased to some degree; prefer orthogonal edges for tiny sizes or simplify the shape.
- Retina sets — export integer multiples of your base grid (24 → 24/48/72), ideally via File → Export → Export to Multiple Bitmaps (Shift+F3) to produce all sizes at once.
- Theming — if your icon won’t change color in code, switch fills/strokes to
currentColorbefore exporting.
Related guides
- Non-Scaling Stroke for SVG Icons
- Combine SVG Shapes with Boolean Operations
- Analyze and Clean Up SVG Icons
- Pixel Perfect Icons the Easy Way (one-click Pixel-Align)
Start Making SVG Icons Today with IconVectors
Download the fully-functional 30‑Day Free Trial and unlock your icon design workflow.
Version 1.70 for Windows and macOS