

An icon set can use the right colors and still look inconsistent because its stroke widths, corners and opacity differ. Save one complete appearance as a Style in IconVectors, then reuse it while editing, drawing or processing a folder.
This tutorial uses IconVectors 2.20 for Windows. You will create an outline preset, apply it to other artwork, share the library and produce styled copies of several icons. The paths and shapes stay yours; the preset supplies their appearance.
1 - Set the appearance on one representative element
Open a simple icon and select one visible, unlocked drawable element. If it belongs to a group, select the child shape rather than the group. Style capture needs one unambiguous appearance.
For a 24-by-24 outline family, start with no fill, a blue stroke, a width of 2.00, round line caps and round joins. Set element opacity to 100%. Change these values in the control bar and Colors panel until that element looks right.
Use the same design grid across the family. A style preserves numeric stroke widths and dash lengths in SVG units; it does not adjust them automatically when you apply a 24-unit design's appearance to a much larger canvas.
2 - Capture it in a library
- Choose View > Colors if the Colors panel is hidden, then open its STYLES tab. If a Libraries / This Icon toggle appears, choose Libraries.
- Choose My Styles in the library list. To keep project presets separate, use the three-dot library menu and choose New Library... instead.
- With your source element still selected, choose Icon > Styles > New Style from Selection..., or use the square-plus button in the Styles toolbar.
- Name the preset Navigation Outline and confirm. It is saved to the chosen library immediately.
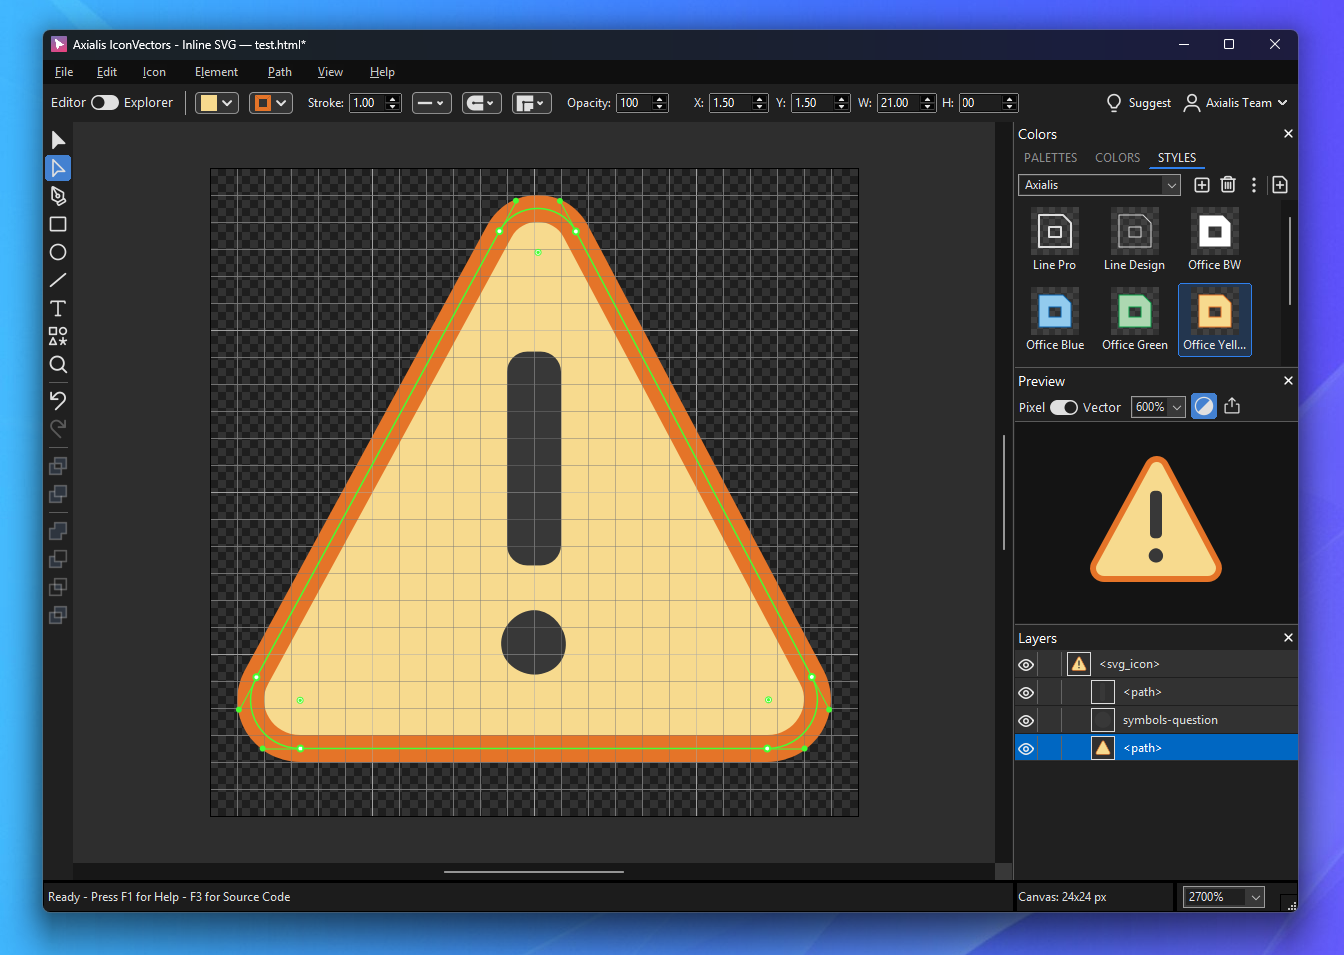
The square thumbnail is a sample shape wearing the saved appearance, not a miniature of your original icon. The preset includes fill and stroke paints, supported gradients, opacity, stroke width, caps, joins, dashes and fill rule. It does not contain the element's coordinates, shape, name or canvas dimensions.
3 - Reuse the preset without redrawing
Open another icon, select the elements that should use the outline treatment, then click Navigation Outline. A normal click applies the complete saved appearance. Selected groups expand to their drawable children. The artwork remains selected, and you can undo this Editor operation with Ctrl+Z.
For an icon with intentional colored fills, right-click the preset and choose Apply Stroke Only. This replaces the stroke settings while retaining the fill and element opacity. Apply Fill Only does the converse. Complete application replaces both channels, so check the selected scope before using a preset across mixed artwork.
To draw new shapes with that appearance, first clear the artwork selection, then click the preset. This sets the drawing defaults for the session and leaves existing shapes alone. If clicking appears to do nothing, check whether you selected the elements you intended to change.
4 - Refine the preset and understand what updates
Right-click the saved preset and choose Edit Style.... Adjust its properties, inspect the preview and choose Save. To replace it with an appearance you have already refined on the canvas, select that source element and use Update Style from Selection.
A library is a collection of snapshots. Editing a saved preset does not restyle icons that previously used it. Apply the updated preset again to those icons, individually or through the batch command below. Library edits save immediately and are independent of the Editor's Undo history.
For linked definitions shared by objects inside one SVG, use embedded styles in This Icon. That is a separate workflow from a reusable library.
5 - Choose fixed colors or a themeable appearance
A fixed blue stroke stays blue when the preset is applied. A stroke using currentColor stays symbolic: it follows the target SVG's color context instead of becoming the gallery preview's fallback color. For a themeable outline preset, use currentColor for the source stroke before capturing it.
If the source explicitly defines an SVG color context, that context travels with the style and can keep the result tied to that color. Check the exported icon in its actual web component; an external <img> does not inherit the surrounding HTML's color like an inline SVG does.
Supported gradients can also travel with a preset. Relative gradients follow the target bounds, while user-unit gradients retain their coordinates. A gradient that suits one shape may need a different mapping on another.
6 - Share the library with your team
Select your project library, open its three-dot menu and choose Export Library.... Save the proposed library-name filename, such as Navigation.axstyle, into a shared project folder. A teammate can choose Import Library... to add that collection to their Styles panel.
The exported file is a portable copy, not a live connection to the managed library. Commit it with your icon sources when the appearance is agreed. If that library is already installed, IconVectors offers to import an independent copy with a new identity and name. Renaming the exported file alone does not update the installed library.
7 - Apply it to a folder of icons
Switch to the Icon Explorer, select the saved SVG files, then choose Batch Processing > Apply Style.... Close any selected source that is open in the Editor first.
- Choose your Style library and Style.
- Choose Complete for the outline family, or Stroke only if fills should survive.
- Use All artwork for this first pass.
- Change Modify Originals to Create Copies. Choose a separate output folder, keep the
-styledsuffix and leave Replace existing files off. - Choose Preview Changes. In Confirm Apply Style, review the before/after example, every file's result and the output paths. Use Back to adjust an option and preview again before confirming.
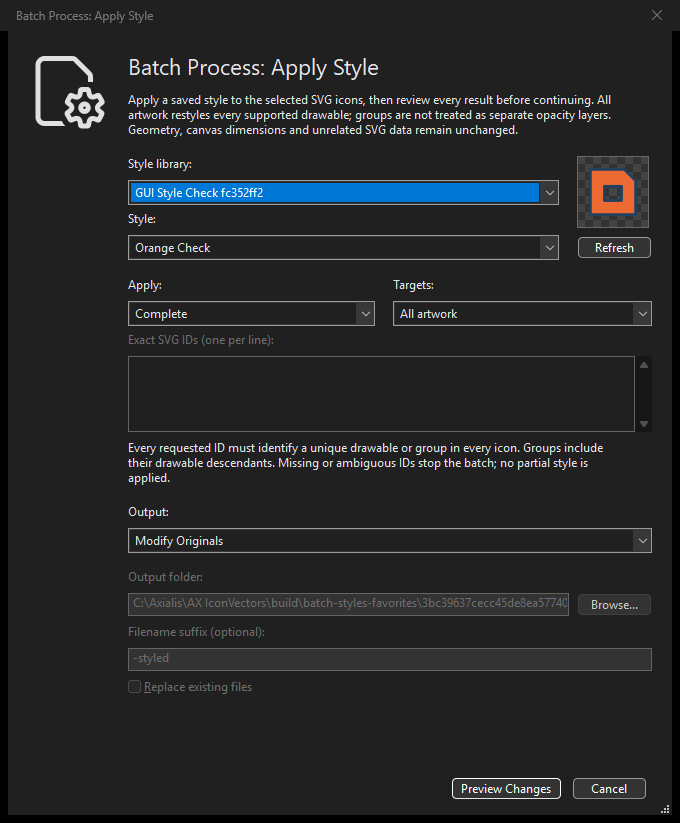
The batch settings persist, so verify the output mode each time. Disk changes have no Editor Undo. A changed source or library invalidates the reviewed plan; return with Back and build a new preview. Unsupported input is reported rather than applying only part of the style job.
You now have a reusable visual definition, editable master SVGs and a reviewed set of styled outputs. The CLI workflow shows how to use an explicit library file when you are ready to automate preparation and export.
Related guides
- Manage shared styles inside an SVG icon
- Edit SVG icons from Visual Studio Code
- Automate SVG checks and exports with the CLI
- Styles reference: capture, application, library editing and storage
Start Making SVG Icons Today with IconVectors
Download the fully-functional 30‑Day Free Trial and unlock your icon design workflow.
Windows 2.20 (November 4, 2026). macOS 2.10 and Linux 2.10 are also available.